You’ve been hard at work in the studio, bringing your new masterpiece to life. The sound is tight, the lyrics fire. Time to get this music out to your fans. They’ve been waiting and they want to get it now.
At vyb, we make it easy for you to send out an email blast to your fans. Below are the steps to make that happen.
Step 1. After Publishing Your Release, Launch a Campaign
Anytime you make changes to an album, you will get a popup that allows you to create a campaign.
Select ‘Create Campaign’
Alternatively, you can go to your dashboard and under the action menu select “+ Create Campaign”
Step 2. Edit Email Content
Now edit the campaign name, making it something you will remember. Only you will see this name
Next, edit the subject and message. Write something memorable and personal. The best announcements don’t just say I have something new, the tell the story of the music. Don’t be afraid to open up!
Now you can also change the banner image for your email.
Then you can scroll down and see preview of the email, including the automatic action button we insert.
Step 3. Set Audience and Timing
The default audience is ‘All’, meaning everyone in your list. If you want to run multiple customized campaigns, just repeat this process. For example, you may want to send a special message to subscribers if they have an exclusive for this release.
Finally, set the scheduled date for your campaign email to begin and press SEND! You are done
To monitor your campaign, open “Campaigns” under the Marketing Hub.
There you can see how many emails were sent how many delivered, etc.
Tips for your Email Campaign
Your fans care about you. They want you to win. Give them a reason to root for you. Don’t just say you’ve got new music and you think it’s cool. Give them some behind-the-scenes information. Tell them about the recording, about the artists you’ve worked with on this release, tell them about the lyrics.
The music campaigns give you a really easy way to tell all your email list about your newest release. To learn more about building up your list, read these articles:
Social media is great, but you can’t talk directly to your audience. In fact, as you build a larger social following, each post reaches a smaller and smaller percentage of them. That’s the business of social media; while the allure is that a post will go viral, the truth is that they are going to charge you to reach your fans.
We have an easy solution for that: use vyb’s direct email tools.
Bypass the Algorithm. Talk to your Fans Directly.
Use email to direct market to your fans. Social posts often reach only 2% of your followers. Fans will open emails 40% of the time; your dedicated fans will read them at a much higher rate!
For more tips, go here. Otherwise, either use vyb’s built in tools or your chosen link in bio service.
Use vyb’s Link in Bio to Connect Your Followers to Your Email Signup
Using vyb’s free Link In Bio Tool, you can easily drive your followers to your list
vyb’s Free Smart Link In Bio Tool automatically has a button that links to your email list signup.
You can just use this free service, add it to your profile, and start people to your list.
Don’t worry that only a small number of people join your list. They are your dedicated fans and the ones you want to build with.
For more information on setting up the free vyb Link in Bio – go here
Link your Email Signup in Your Existing Link In Bio Tool
If you have your own link in bio tool that you already like, simply navigate to Contacts Management in your artist dashboard and you can copy the list signup link.
Paste the Signup Link into your link in bio tool and your are ready to drive followers to your email list
Escape the Algorithm
Doesn’t matter if you use vyb’s free Link in Bio tool or your own; get off the social media treadmill by taking ownership of your fans.
- Periodically remind followers to join your fan club
- When you post content like new merch for sale on vyb, remind your followers that they can get to be the first to get notified by signing up for your fan club
- Use the email list thoughtfully. Don’t spam out at people with tons of messages. Take the time to do storytelling.
- Don’t just say that you have something new for sale, tell your fan club why this is unique and why they should care
Use your email list and you build up a loyal fan club that wants you to succeed.

When it is time for your livestream, you can set up a separate production sub-account with limited access only to the streaming for your event. This sub-account is completely optional. If you are controlling all your livestreams yourself, you can simply use your artist account.
But if you have a larger production, then with a sub-account, you can simply give access only to the streaming part of your event, all the rest of your account is kept separate.
Here are the steps to setup and manage production sub-accounts
Step 1. Navigate to Sub-Accounts in Your Profile
Click ‘My Profile’
Select ‘My Team’
Click ‘My Sub Accounts’
Step 2. Create a Production Sub-Account
Click ‘Create Sub-Account’
In the pop-up, give your sub-account a user name, and select the Live Stream role
Click ‘Create’ to make the sub-account
We will auto-generate the password.
Step 3. Copy User Name and Password
You can now copy your user name and password for the sub-account.
From the action menu you can generate a new password or delete this sub-account
Step 4. Log in to vproduction.vyb.co
We have a dedicated site, vproduction.vyb.co for your production team. Simply login with the sub-account username and password
Step 5. You are ready to go!
Your production team will see all your upcoming events. They can simply select the event and setup and run all the streaming.
Selecting an upcoming show will allow you to set up and test your livestreaming. You won’t be able to start the show, but you can test.
‘Make Test Recording’ streams out 30 seconds of audio and video to the vyb servers. You can watch and listen to the playback to ensure you have the correct quality.
‘Test Event’ allows you to send a link out to multiple people who can watch/listen to the setup. Test Event is available up to 15 minutes before the event.
You can re-use the sub-account name and password for different events, or to be more secure, reset the password for each event.

When it is time for your in-person app, you can use the web or mobile version of the vyb ticket scanning app.
In vyb we have the ability to set multiple scanning users, and for each scanner, they can change their scanner role on the fly. For example, you will be default always have a ‘Door’ role for scanning people at the entrance. Additionally, we auto-populate a role for each in-person ticket tier. For example, if you have GA and VIP seating, you will find those roles.
Note: the native mobile scanning app is now in beta, to get access to the beta contact help@vyb.co
Step 1. Set up a scanner user as a sub account
Navigate to sub-accounts by clicking My Dashboard, My Team, My Sub-Accounts
Click Create Sub-Account
Give your subaccount a username and select the Ticketing role.
We will auto-generate passwords for all subaccounts.
For each of your sub-accounts, you can now easily copy the username and password and send to your team members.
Under the Action menu you can delete a role or reset the password
Step 2. Navigate to vybtix.com
Navigate on your mobile over to vybtix.com. When it is released, you’ll be able to download the vybtix mobile app from the app store.
For the web app, click on “Use Web Version”
Step 3. Log In
Log in to the account using the ticket scanning account created above.
Step 4 Select Event
Note that if you don’t have an upcoming event, you won’t see any events to select
You also won’t be able to scan until the day of the event
Step 5. Select Tier to Scan
You can choose which tier you need to scan. By default, there is a main door scan location.
Note we only allow a QR code to be scanned once at the door and again at a specific location. For example, if you have a VIP section, the fan will be scanned once at the door by a person with the ‘Main Door’ role and then a second time by a person at the ‘VIP Seating’ entrance. You’ll want to give the fan a stamp or wristband in they’ll need to be able to leave and re-enter the VIP area, because we will not allow a duplicate scan. This way we prevent duplicate use of a QR code
Beta Scanning App
To get access to the beta of the ticket scanning app, please contact help@vyb.co
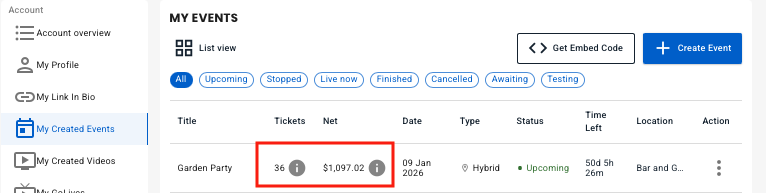
Using your artist dashboard, you can easily monitor in real-time sales data from your event.
Navigate to My Created Events in Your Dashboard
First, navigate to your dashboard and “My Created Events”
We show the total tickets sold and the total net revenue to you here.
Hovering over the tickets gives you a quick ticket count breakdown
Hovering over the sales data gives you a total sales breakdown
View Detailed Sales Data
To access your detailed sales data, click the action menu for the event and click “View Sales Data”
The detailed event sales data breaks down all gross sales, Stripe and System fees, and how things are broken down by artist.
In the example to the left, Garage Band Demos takes 80% of the cut, the opening band, Rickstar Band, gets 20%
A few explanations: For all in-person tickets, the ticket service is free for the artist. The fan pays only a $0.99 fee.
For the Virtual Livestream, vyb’s fee is 20%.
For more information on pricing and fees, please visit our pricing page here.