Making your merch is easy, but now let’s get the designs out there and moving!
Email is much better than social media posts, because you own your audience instead of being at the whim of the algorithm.
At vyb, we make it easy for you to send out an email blast to your fans. Below are the steps to make that happen.
Step 1. After Publishing Your Merch, Launch a Campaign
Once your merch is published and the status is changed to “Completed”, under the action menu select “+ Create Campaign”
In the same way, your can promote an entire merch collection at once by creating a campaign for that collection.
Navigate to Collections, click the action menu for that collection.
Step 2. Edit Email Content
Now edit the campaign name, making it something you will remember. Only you will see this name
Next, edit the subject and message. Write something memorable and personal. The best announcements don’t just say I have something new, the tell the story of the merch. Don’t be afraid to open up!
Now you can also change the banner image for your email.
Then you can scroll down and see preview of the email, including the automatic action button we insert.
For Collections, we will insert clickable images of the first three products in the collection and an action button that goes right to the collection on vyb.
Step 3. Set Audience and Timing
The default audience is ‘All’, meaning everyone in your list. If you want to run multiple customized campaigns, just repeat this process. For example, you may want to send a special message to subscribers if they have an exclusive for this release.
Finally, set the scheduled date for your campaign email to begin and press SEND! You are done
To monitor your campaign, open “Campaigns” under the Marketing Hub.
There you can see how many emails were sent how many delivered, etc.
Tips for your Email Campaign
Your fans care about you. They want you to win. Give them a reason to root for you. Don’t just say you’ve got new merch and you think it’s cool. Give them some behind-the-scenes information. Tell them about the artwork, tell them why this merch, give them a reason to root for you.
The merch campaigns give you a really easy way to tell all your email list about your newest merch drops. To learn more about building up your list, read these articles:
We’ve all been there, we wait in line for a looooong time, finally get to the front of the line and that killer shirt we want is gone, not available in your size. You quickly scan the rest on the wall, but often you just leave.
Or sometimes that line is just too damn long. You want to buy some merch but you also want to get clsoe to see your favorite band. You wait and you wait, but the set is about to start and you need to grab a beverage and find your friends, so you give up and leave.
Even worse, at vyb we’ve talked to artists who run out completely on the third night of a seven-city swing. Your fans leave disappointed, you’ve not made nearly what you should on the tour.
Every artist that tours consistently has it – boxes and boxes of unsold merch. Whole storage unit rented to hold oddball sizes of mech you didn’t sell when you were at your show.
To take care of all these problems, at vyb we give you the tools to sell more merch by letting your fans easily buy from an online store at your gigs. Here are the steps to download a QR code or poster that will take your fans right to your online store and buy your merch. Never lose out on a sale!
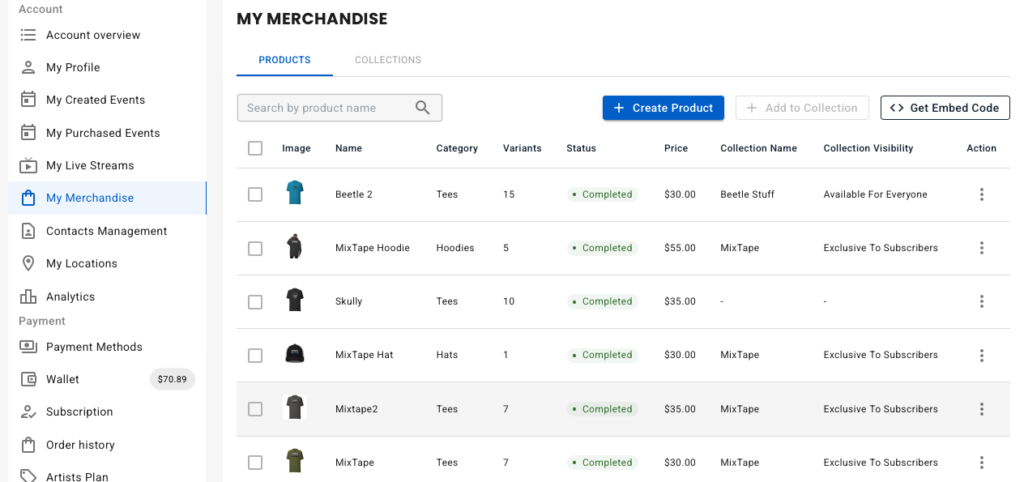
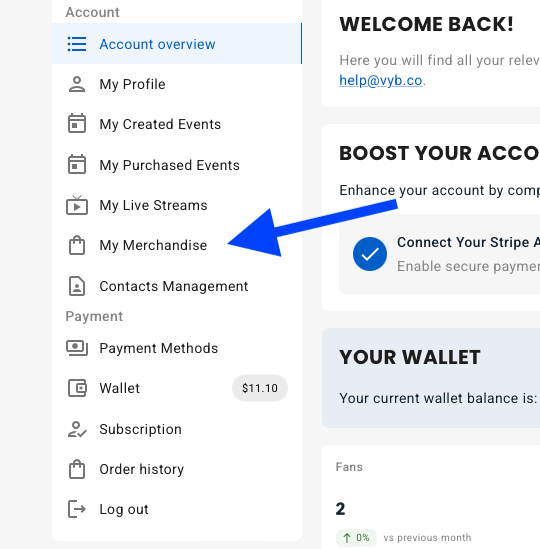
Step 1: Navigate to My Merch in your artist dashboard.
Navigate to My Merch on your Artist dashboard.
At the top you see a new button, Get QR Code. Click that.
Step 2: Edit Auto-Generated QR code Merch Poster
We auto-generate the poster using your artist name, your banner image and your profile picture.
Note that this is the vyb help account, so the band name is vyb, your band name will be there instead, there is no vyb brandign forced on your poster – lol.
You can replace either image by simply clicking the edit icon in the upper right of the image.
Step 3. Download and Print Poster
If you are happy with the poster, just go ahead and click the download button to get a pdf poster. Print a bunch of these and post them around the merch table. People who are tired of waiting in line can simply scan. Keep a few copies at the merch table so that if you run out of sizes, ask people to simply scan and order online. They’ll receive their order in two to three weeks, so no worries that it won’t show up.
Make your own poster
If you don’t love our dead-simple poster and are feeling creative, click and download the QR code itself. You’ll get a transparent png file that you can add to any poster that you create.
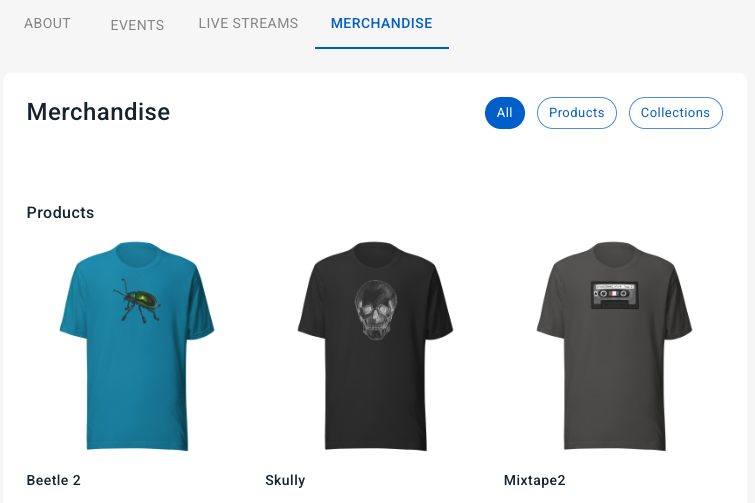
Fans are sent to a mobile-friendly store to buy your merch
Fans will be automatically send to your merch store on vyb, and from their mobile can easily purchase.
Never lose any merch sales
By using your vyb online merch store, you never have to lose out on merch sales or keep buying oddball sizes that never sell. Consider only buying the main sizes and letting people buy XS, 3XL, 4XL online, saving you money.
With vyb, you can embed your merch store onto your own website. This way your fans can discover your merch from your website and you can still let vyb take care of all the checkout and order fulfillment. The best part is that once you’ve embedded your vyb store onto your website, whenever you add new merch on vyb it automatically shows up on your website without doing anything.
This tutorial assumes you already know how to make merch and have your store setup. If you need a tutorial on doing that, simply go here: Creating merch in vyb.
To allow you to sell merch from your own website, we are going to make use of a web feature called an embed code. An embed code is a snippet of HTML that allows you to display content from one website onto another.
Here are the steps:
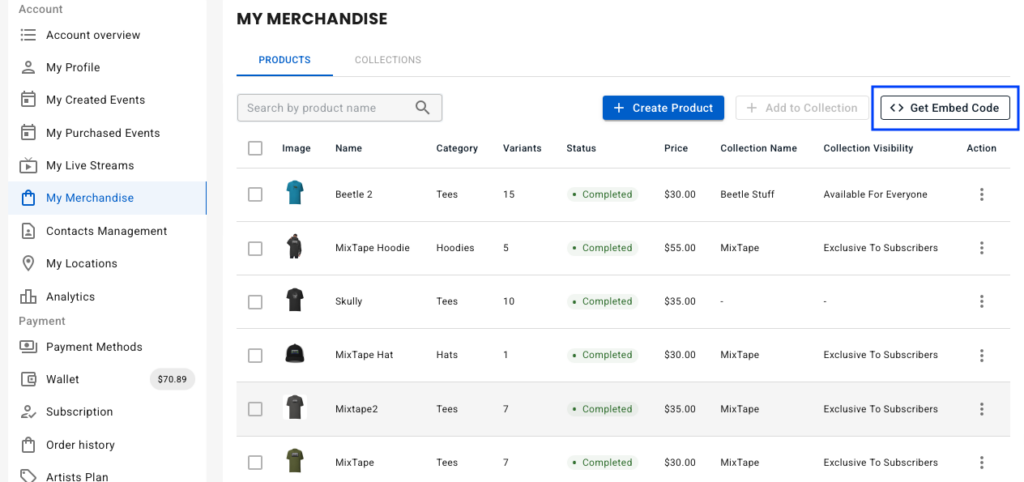
To start off, first go to you vyb artist account, “My Dashboard”, “My Merchandise”
2. Now click on button “Get Embed Code”
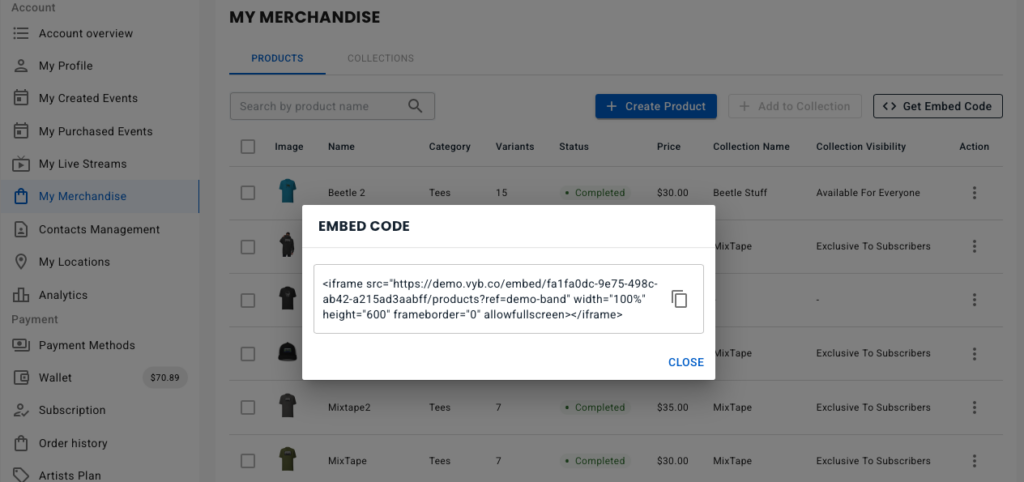
3. You’ll get a popup that shows the code. Click the copy icon
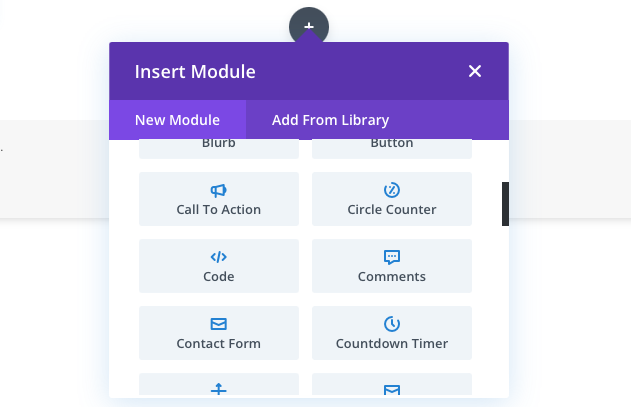
4. Now go over to your web design software. In this example I’m using a simple WordPress site. You are going to insert a block or module, and you are looking for something called “Code”
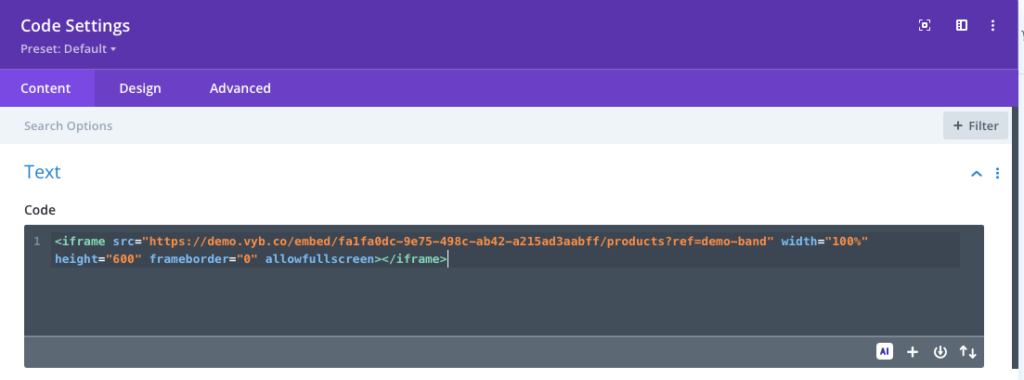
5. Add the Code module or block, open it and paste in the code that you copied. It should start with <iframe
6. Now hit save and you should see all your vyb products on your webpage
And that’s it! Your fans can now find your merch from your website. They can scroll through the list of products and simply select one, that will take them right to your vyb store for checkout.
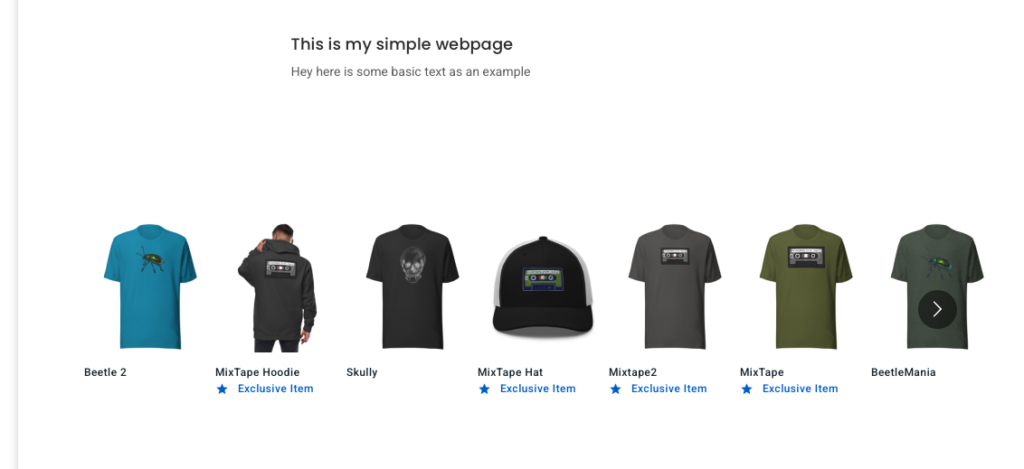
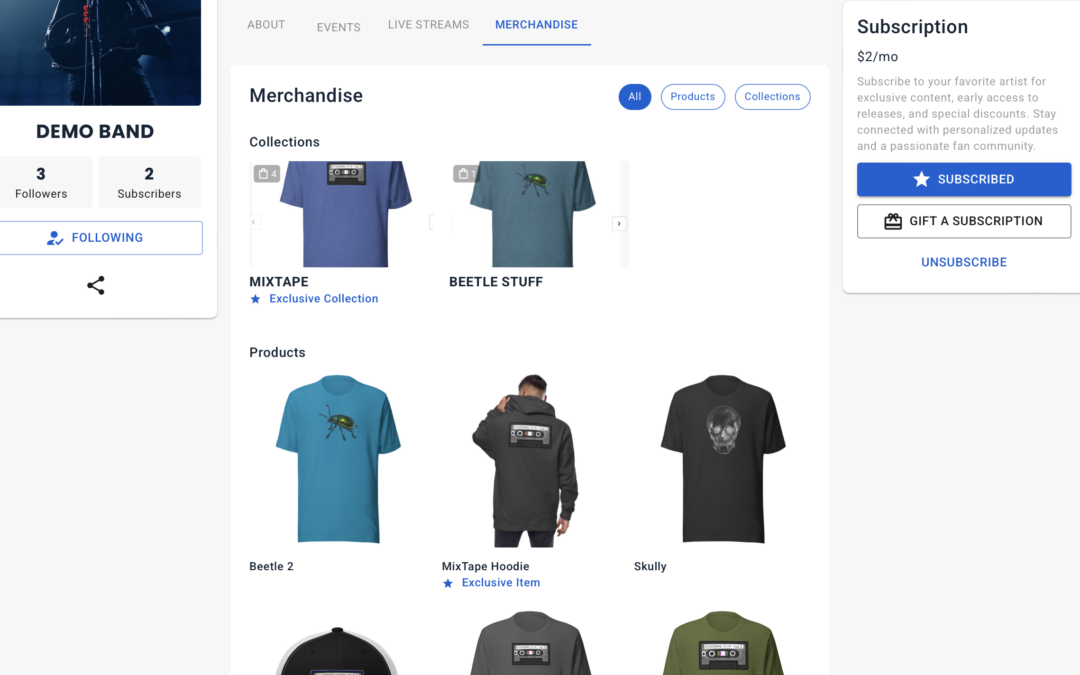
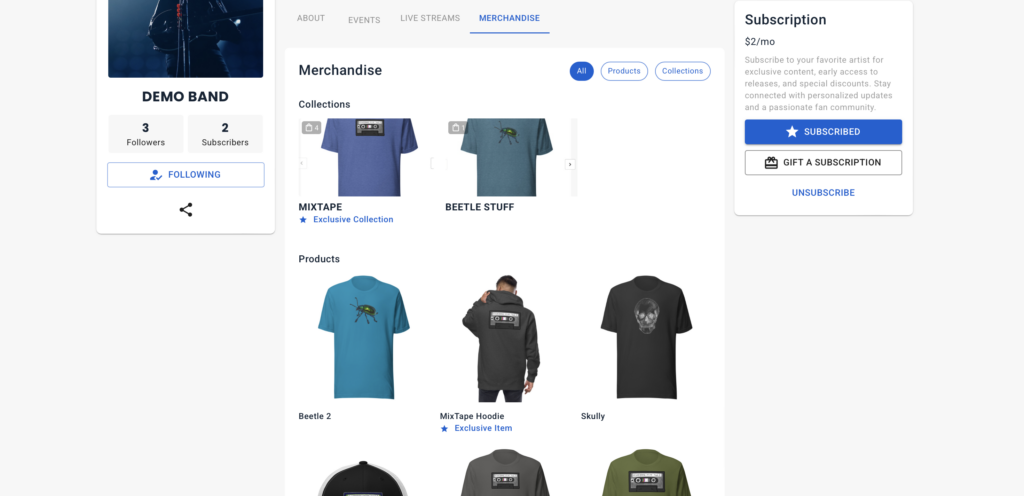
Merch collections are a way to group together merch with common design elements for an easier shopping experience as well as set exclusive access to merch.
As you design your merch, you should put common themed items into a collection. You can create either create the merch items and add them to a collection, or make the collection first and then as you create merch items add them into the collection.
Either watch this video or read below how to add items to a collection and make that collection exclusive for your subscribers.
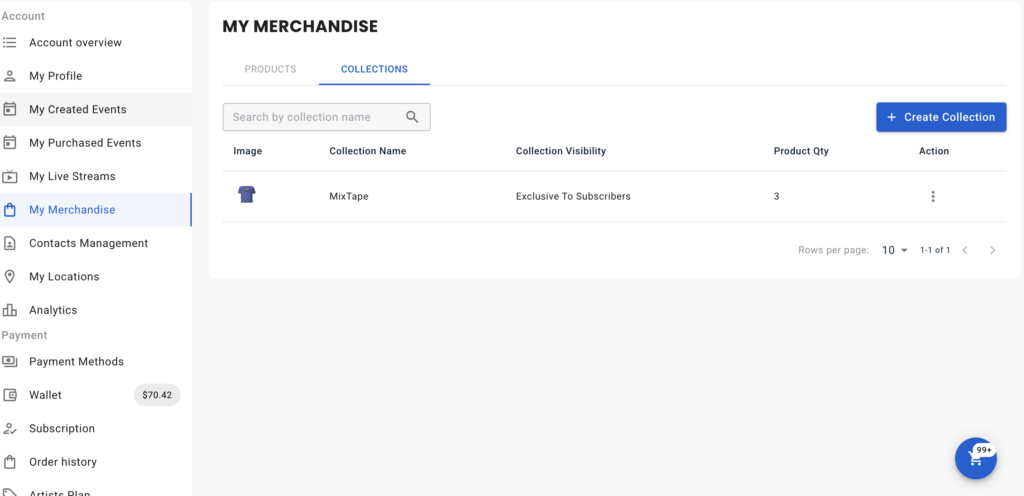
Create a Collection from Collections Menu
In My Merchandise, Make at least one product with your design
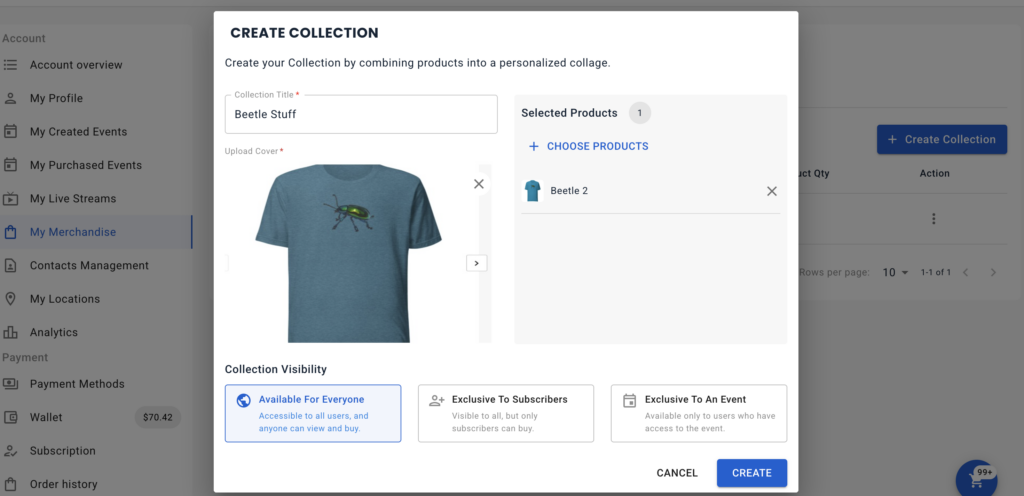
Click Collection and then +Create Collection
Give your collection a name, select the product, and then select the access
When you create the collection, you have three choices for access:
Available for Everyone: Use this selection for when you want to simply group a set of merch with common designs and make it available to everyone
Exclusive to Subscribers: With this you make the collection only available for purchase for your subscribers. All fans can browse it, but they will be prompted to subscribe before they can purchase it
Exclusive to Event: Use this selection to make a set of merch only available to people who have purchased tickets for an event.
Add products to a collection as you create them
When you create a product, you can automatically add it to a collection
Simply select a pre-existing collection from the pull down.
Creating a Collection with existing products
To create a collection with existing products, do the following steps:
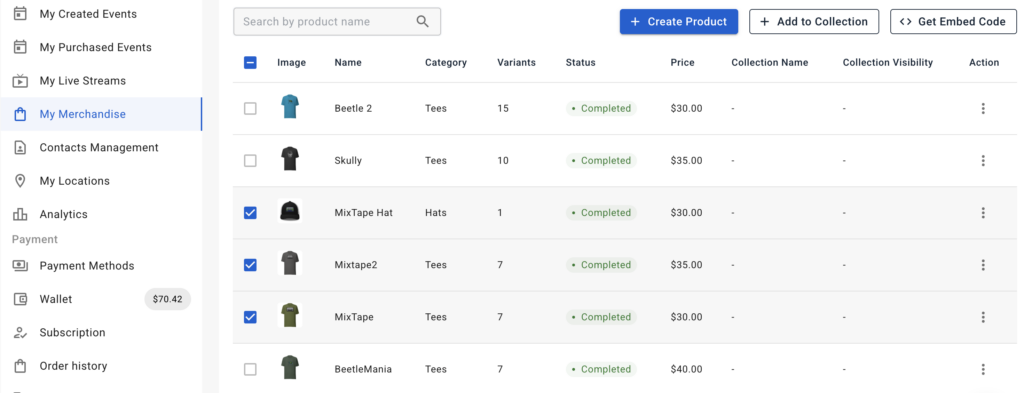
Navigate to My Dashboard/My Merchandise
Select the products you want to group into a collection
Select “+Add to Collection”
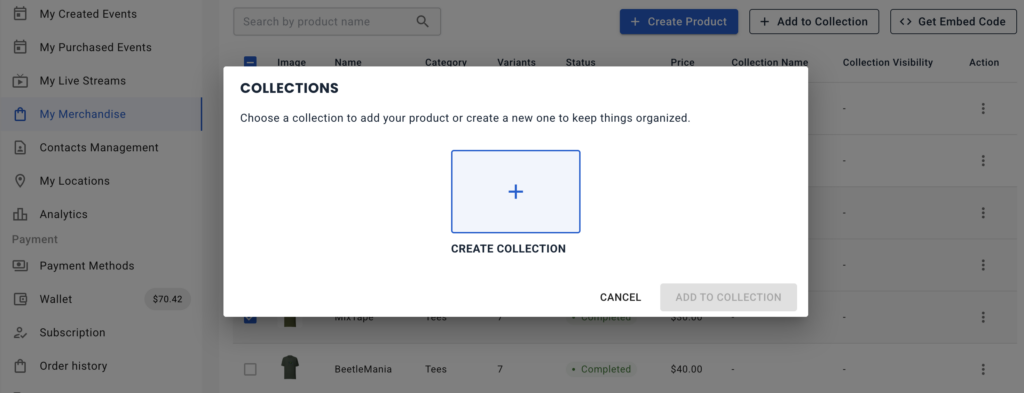
Either select an existing collection or select “Create Collection” to make a new one
Give your Collection a name unique to your store.
If you choose, you can add/remove additional products to the collection.
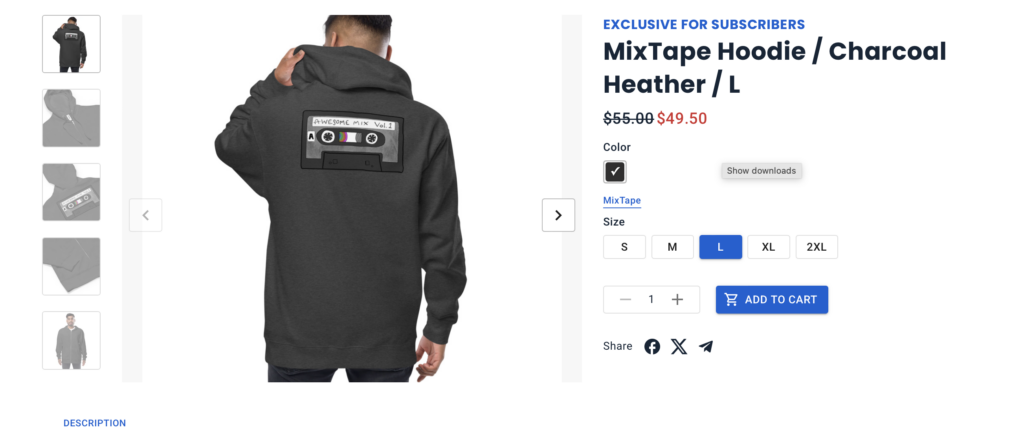
Subscriber Exclusive Merch
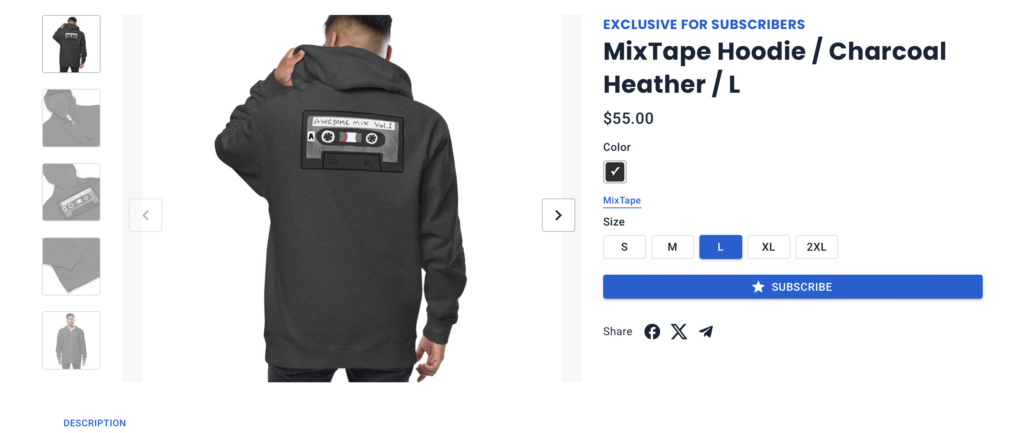
When a fan browses your merch store, if you have made a collection exclusive to a subscriber or an event, now that will be shown to the fan. They can still browse everything, they just can’t purchase if they don’t have access
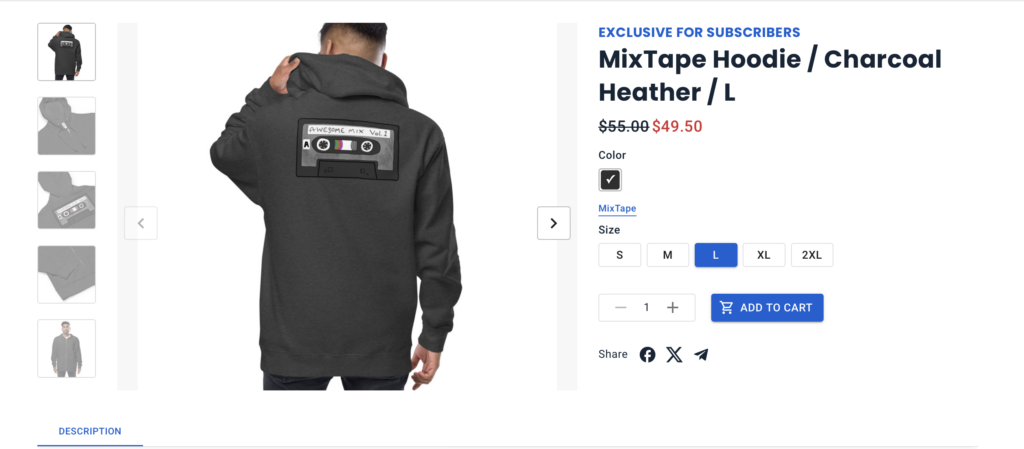
When a subscriber clicks on that item, they see the subscriber discount price and the “Add to Cart” is active. They can purchase it.
When a non-subscriber clicks on that item, they can view the item, but notice that they cannot Add to Cart, instead they are promoted to subscribe
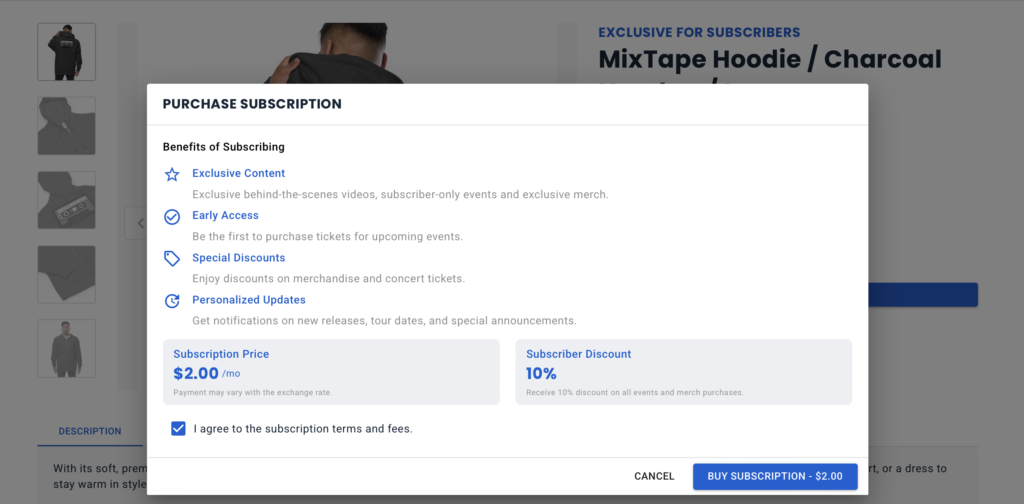
When they click on ‘Subscribe”, they go through the subscribe flow
And after subscribing they are able to purchase the item
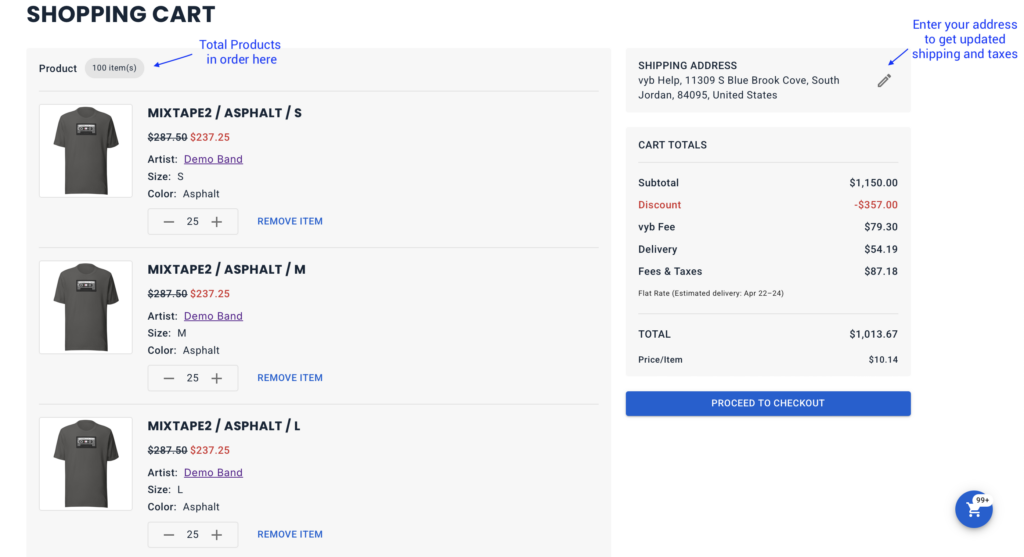
Artists can order their own merch at steep discounts. While each individual product is slightly different, you can save as much as 30-50% off the base price by ordering 100 or more of an item.
The great thing is that discounts are computed based on the individual product type and design. Discounts are added across all sizes.
For example:
For a given T-Shirt with your design, if you order 100 shirts: 25 Small, 25 Medium, 25 L and 25 XL, you get the same discount if you instead decide to order 15 Small, 25 Medium, 30 Large, 30 Xl. The 100 shirt discount applies the same, no matter how you split them up across the sizes.
To learn how to order your own merch in bulk, either watch this video below, or read the instructions:
Step by Step process
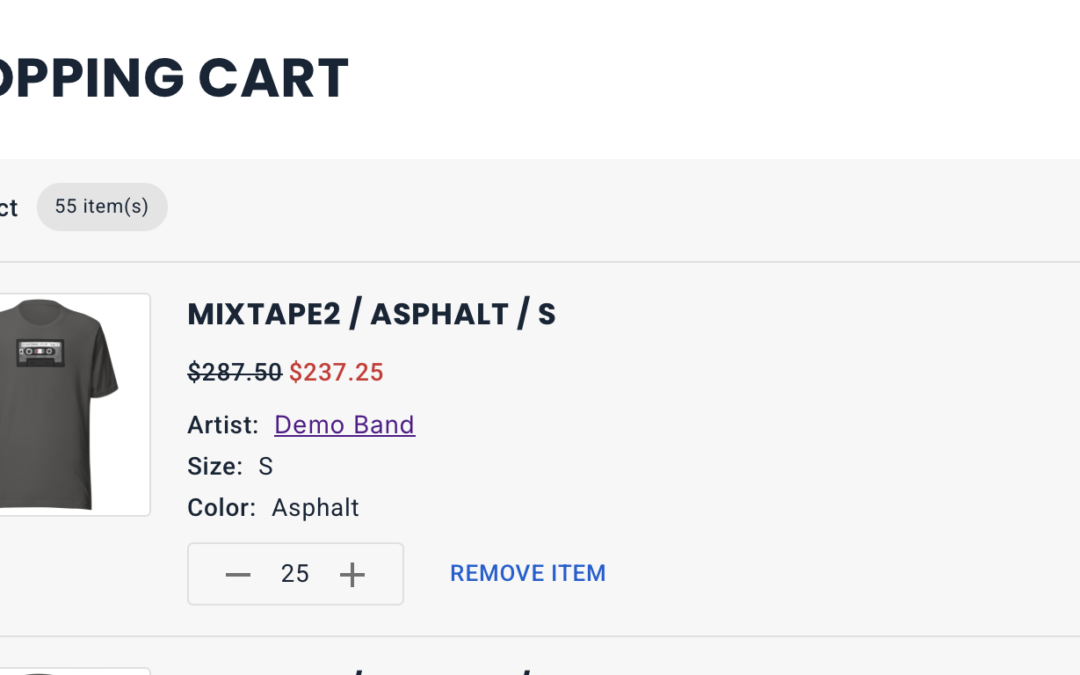
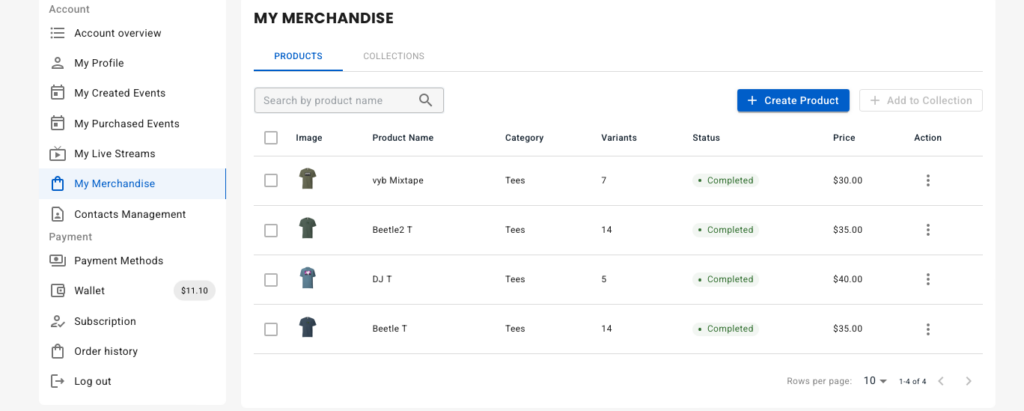
First navigate to “My Dashboard” and select “My Merchandise”
For the item you want to order, select “Bulk Order in the action menu”
We will automatically add 5 items in each size. If you don’t want to order 4XL for example, simply delete the item.
In the top left is the total number of items
Enter your shipping address to get shipping and state taxes.
Once you have decided the number you want for your order, simply proceed to checkout and pay
In vyb you can create and sell merch with no upfront fees and no cost. We have curated the most popular products for you. Some features of merch in vyb:
Print-on-Demand – You simply upload the designs, your fans buy them, and you get paid! No more shelling out thousands of dollars for merch and sitting on inventory of odd sizes
Worldwide low-cost shipping – merch is produced at one of a dozen facilities around the globe. The fan simply enters their address and the system automatically selects the nearest facility. This means you can sell internationally without worry that the shipping cost puts your merch out of reach of your fans
Easily try different designs – as it costs you nothing to try a new design, you can easily try different designs and color variants to see which ones your fans want. Those are the designs you should take on tour.
Multiple color options – For every design, you can easily give the fan the ability to choose a different color variant. Like the T-Shirt in black, but think it pops in pink? Give your fans both options.
Designing your Merch
To learn how to design your own merch you can either watch this video or read below
Step 1: Start by going to your artist profile and selecting “My Merchandise”
Step 2: From My Merchandise, select “Create Product”
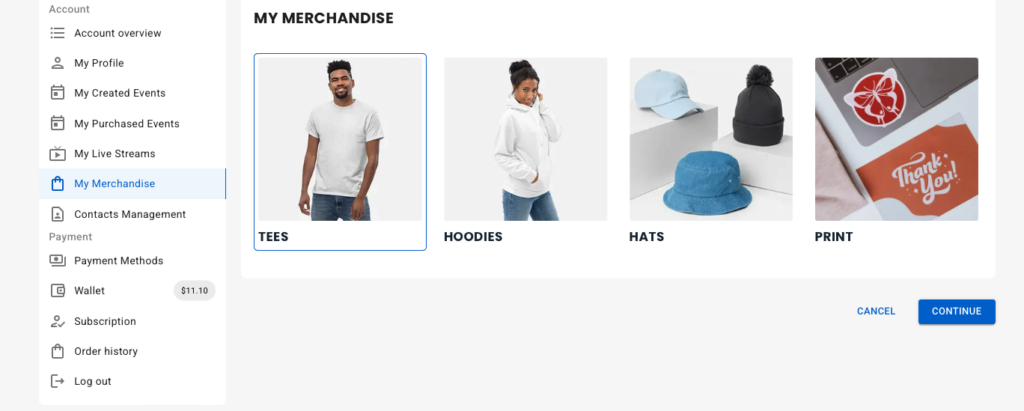
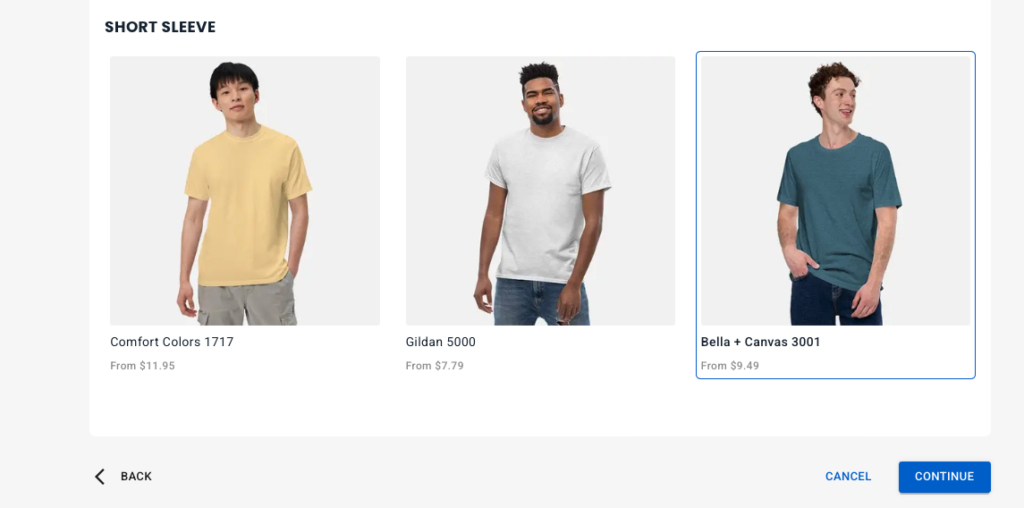
Step 3: Choose the type of products you want to create
Step 4: Now select the specific one that you want to create
The price listed below each item is the base price including the garment cost and printing on one surface
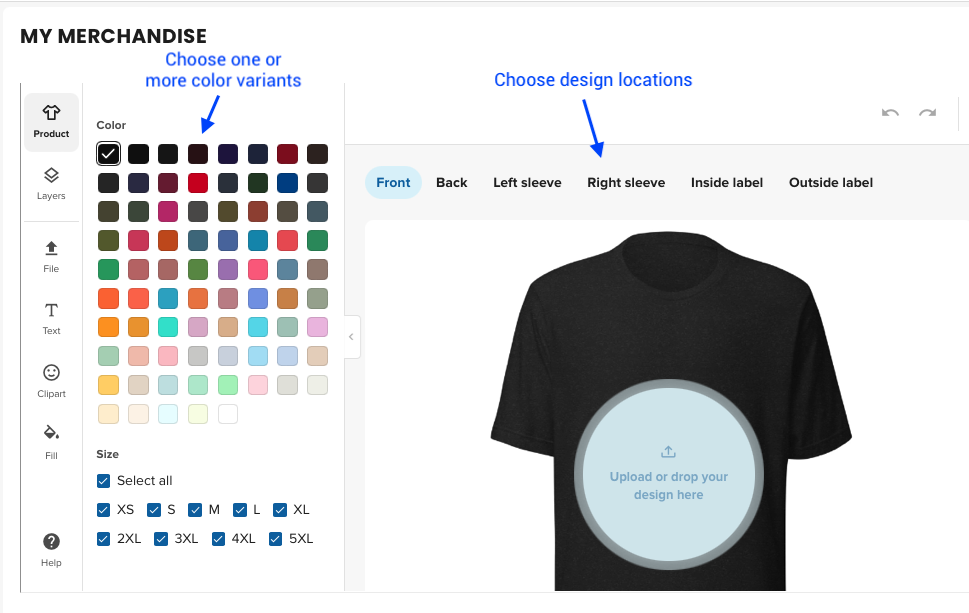
Step 5: Now you are in the designer. Clicking on “Product” in the left toolbar lets you choose the colors you want in your design. Choose one or more color. Make certain to uncheck any colors you don’t want as a variant
You choose the design locations, then click the blue circle to upload artwork
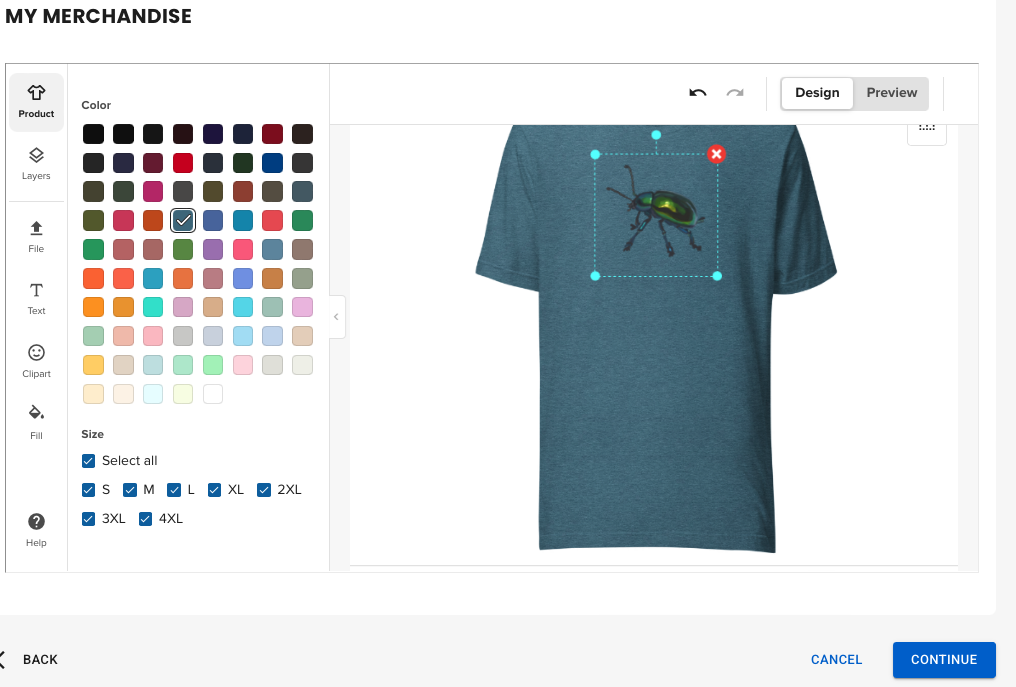
Anything you have previously uploaded will be saved into your file library. In this way you only need to upload artwork once and use it across multiple merch items
Upload artwork or select from previous artwork.
One you’ve selected the artwork, you can resize and position it.
When you are done designing, simply “Continue”
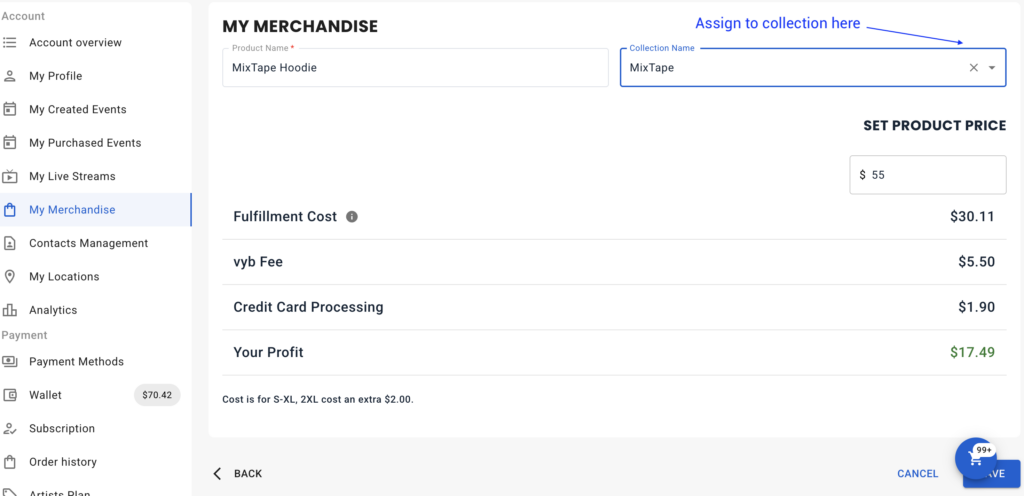
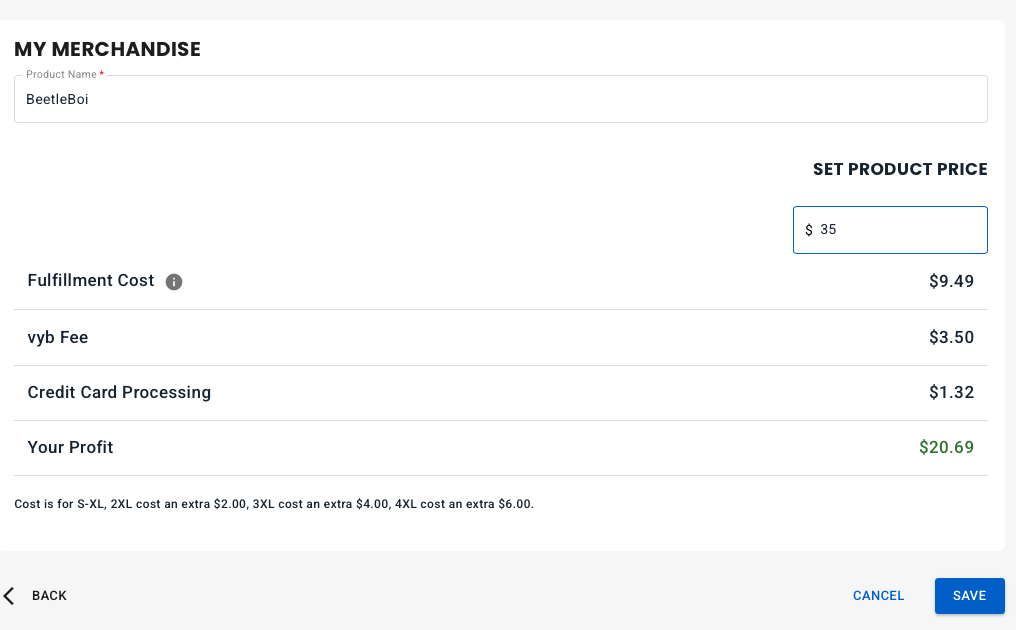
Step 7: Set the product name, it will need to be unique within your store.
Also set the price your fans will pay. The fees and profit will automatically recalculate.
Press “Save” when you are done
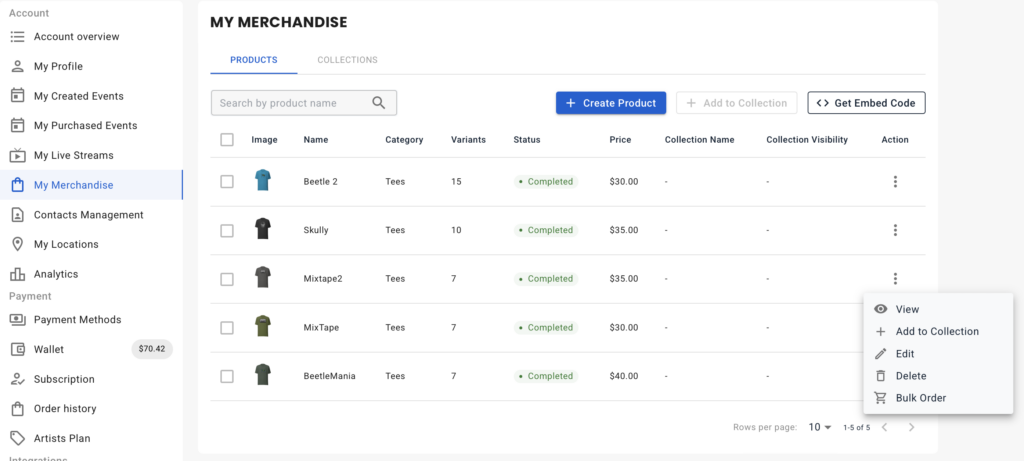
After saving, you will be returned to the My Merchandise dashboard. Your newly created product will be “pending” for a minute or so while we generate all the views and publish to your store.
In the Action menu you can find the ability to View, Edit, Delete, and Bulk Order your merch.